SwiftUI is becoming more and more popular as developers are choose this technology to build their apps. We already have an article introducing SwiftUI, but this time we wanted to go a little bit deeper and see how SwiftUI manages the data.
SwiftUI adopts a declarative programming style, focusing on what to update rather than how to update it. And that's where the SwiftUI data flow comes in and takes care of the rest. Every time data changes, SwiftUI rebuilds all views that depend on that data from scratch.
This is precisely why data flow is one of the fundamental pillars of SwiftUI. You define your UI and provide it with data that you know will work. At this point, after running the app you will see that all seems to be working by itself, automatically. Without much effort everything is kept in sync.
But that data flow in SwiftUI can be confusing at first, because it's completely different from how it's done in UIKit. So we are going to see different tools for data flow and when to use each of them.
Before seeing how each of the ways in which we can handle data works, we are going to see what the data flow itself is like since it is different.
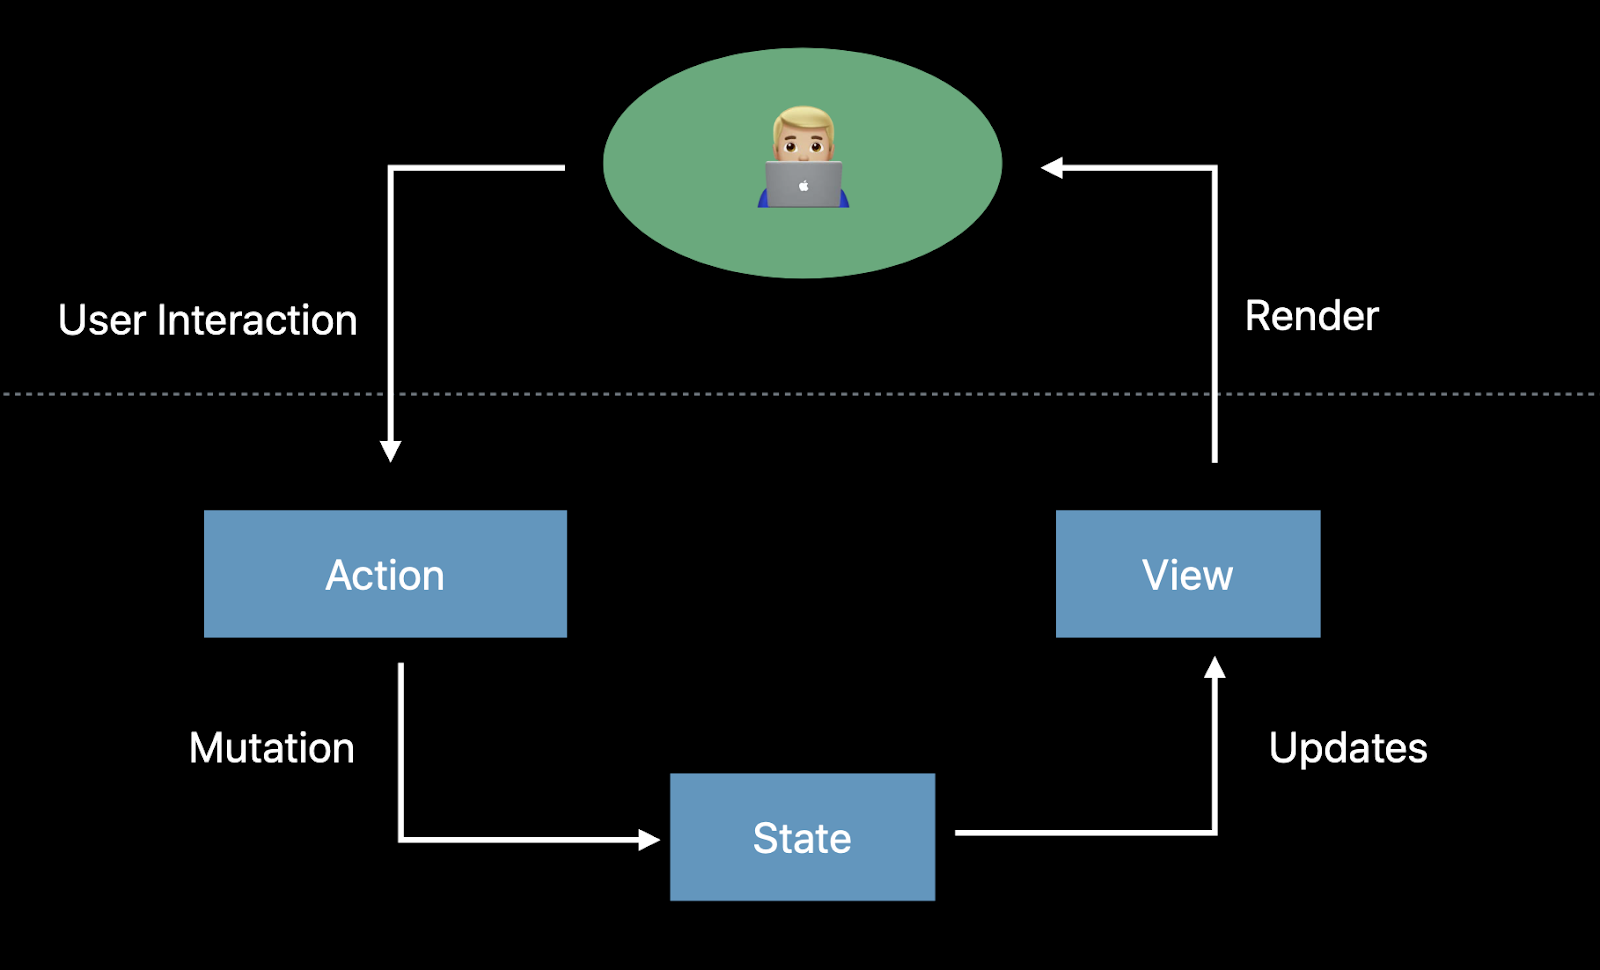
The first thing we need to understand is that views are a function of state (state driven), not a sequence of events. Rather than having the user make an interaction so that the view is updated through an IBAction (like we do on ViewControllers), SwiftUI updates the state whenever an interaction occurs. In SwiftUI the ViewControllers no longer exist and when there is an interaction the state is changed or mutated. That state change is what causes the view to update and causes it to re-render itself, as shown in the diagram above.
The data flow is handled using property wrappers. And it is based on the concept that data has a single “source of truth”. That there is only one place that determines the value of a data.
The ways in which we can send data can be divided depending on whether the data is by value or reference.
If it is a value type (for example String, Integer, Struct, etc):
- @State
- @Binding
If it is data that we have to share with other views in the app, we use a reference type or a class:
- @ObservedObject
- @StateObject
- @EnvironmentObject
Now, let's go into more detail about each of these tools. In SwiftUI views are structs, and if we define a property inside a struct we are not able to change it, since structs are immutable. So, the property wrapper State addresses this problem. State is the property wrapper that we are going to use when we want to keep track of the transient state that is owned by the view. So what we do is to change our common property by adding the @State property wrapper to it. This allows the view to hold the state of the property. We create and use it in the same way, but now when this property changes, the view is going to remember its state and render the UI according to that state.
We can make the State more interesting by combining it with “binding”. @Binding allows us to read and write a property without owning it, because it derives its value from State.
Regarding the reference type tools, when we want to share data with different views in different hierarchies throughout the app, we have to switch to another type of data flow, one that is reference-based. For example, when we are working with external data. This is because sometimes data changes externally from our views and we need a way to be notified. That's why we need to switch to classes instead of structs which are of reference type.
To facilitate the flow of this data, the authors of swiftUI created a protocol called ObservableObject. It has a publisher and every time a property changes it will notify everyone who is subscribed listening. This protocol forces everyone who implements the protocol to be of type class, and this is the protocol that these three properties use, to basically be able to pick up notifications throughout the app.
The first tool of this category is the @ObservedObject. This tool allows us to observe the observableObject by defining an @ObservedObject in our class, saying “this is the property I want to be notified of”.
The second tool is the @StateObject. It is very similar to the @ObservedObject. The difference is that @ObservedObject invalidates and recreates views with each external property change, and @StateObject doesn’t recreate the view every time and lets the view manage the state locally.
Last, but not least, we have the @EnvironmentObject. This property wrapper eliminates the coupling. Here you inject EnvironmentObject at the top of your view, and it will be made available to all subviews without having to explicitly reference.
Coding
Now, let’s see some code for those of you eager to start using these tools! We are going to start with an example of @State and @Binding.
%252011.58.03.png)
With this code, we define a State data that is the “isPlaying” variable in the PlayerView. We are able to access that data and modify it from the ImageButton View using binding property wrapper.

Let’s see now an example of the @ObservedObject and the difference with the @EnvironmentObject.
%252012.25.05.png)
We define our Animal class following the ObservableObject, and published two properties. Then in the code below we can see how the observableObject is injected and passed through the hierarchy explicitly to be able to use it where it’s necessary.
%252012.26.09.png)

With the environmentObject we don’t need to explicitly pass the object through all the hierarchy, we just inject it once at the top and then pull it when needed. We can see the code where we define it below.
%252013.06.32.png)
To sum up, we think SwiftUI is a very powerful framework that has reinvented the way we manage the data and this allows us to have more effective code with less bugs. Go ahead and give it a try - it's definitely worth it!


